In this article, you’ll learn:
-
Why product variants are important
-
How to create variants in Shopify
-
How to correctly connect them to Everspring
-
How to safely clean up old products without losing connections
Why Use Variants?
Creating product variants provides a better shopping experience for your customers.
-
Improved user experience
Customers can view all available versions (like colors or sizes) of a product in one place, instead of finding separate listings throughout your store. -
Higher conversion rate
If a shopper lands on the pink pot but prefers blue, they’ll instantly see that option — preventing lost sales. -
Increased average order value
When customers see multiple attractive options, they’re more likely to add extra items to their cart.
Before You Start: The Three Things You Must Get Right ✅
To make sure your variants sync correctly with Everspring, three key settings must be correct for every variant:
| Setting | What it should be | Why it matters |
|---|---|---|
| Vendor | Everspring |
Tells Shopify which supplier manages the product |
| Stock location | Everspring |
Ensures orders are fulfilled through Everspring |
| SKU | Correct Everspring SKU | Links the variant to the matching product in Everspring |
⚠️ If any of these three fields are missing or incorrect, Everspring will not recognize the product, and orders will not be processed.
Step 1: How to create variants in Shopify
-
Open the main product
Go to Products in Shopify and choose the product you want to use as the main listing. -
Click “Add variant”
-
Choose an option such as Color or Size.
-
Add your first variant (for example, Black).
-
Click Done, then Save.
-
-
Add additional variants
-
Click Add variant again.
-
Enter the next color or size (for example, Blue or Pink).
-
Click Save.
-
Step 2: Adding Images to Variants
Each variant should have its own product image.
-
Use your Everspring product catalog images
-
You can download the images directly from your store’s storefront view.
-
Or use the live product feed (a CSV file containing all product data, including image URLs).
-
Copy the correct image URL for the variant and upload it in Shopify.
-
-
Attach the image to the correct variant
-
Click Add image for the variant.
-
Upload or select the right image.
-
Click Save.
-
Step 3: Connecting Variants to Everspring
This is the most important step. Each variant must be linked to Everspring using the SKU (Stock Keeping Unit) so that orders are processed correctly.
-
Open the variant you want to connect.
-
Set the vendor.
-
Under Vendor, enter Everspring.
-
-
Set the stock location.
-
Under Inventory → Location, make sure the stock location is set to Everspring
-
-
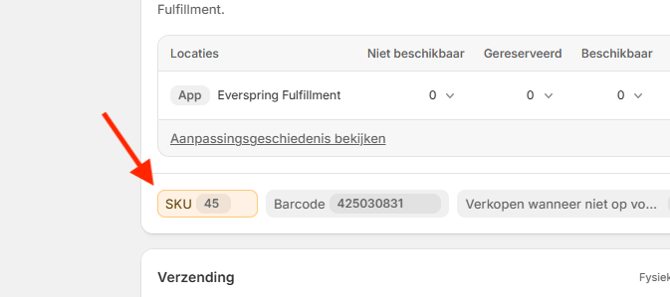
Enter the correct SKU.
-
Find the SKU in your Everspring catalog or from the original linked product.
-
Copy and paste it into the SKU field.
- When you enter the SKU for your variant, the SKU field will highlight automatically if that SKU already exists in your product database. This visual cue confirms that the variant is properly linked to an existing product in Everspring.
-
-
(Optional) Add the barcode if available.
-
Click Save.
⚠️ Important: Only variants with all three values correctly set:
- Vendor = Everspring
- Stock location = Everspring
- Only a valid SKU will be recognized and synced by the Everspring platform.
If any of these are missing, the product will not be processed when an order is placed.
Verify and Clean Up
Once your variants are connected:
-
Check your product page.
-
Visit the product in your storefront.
-
Switch between color or size options to confirm that the correct images and details load for each variant.
- Make sure the product is visible live and reflects the correct vendor, stock location, and SKU.
-
-
Delete outdated single products.
-
Go back to Products in Shopify.
-
Delete the old standalone products that have now been merged as variants.
-
These will not be recreated by Everspring once your variants are correctly linked.
-
⚠️ Critical Warning (do not skip this step):
Before deleting any products, always test your new variants live on your store.
Open your storefront and make sure each variant is visible, selectable, and displays the correct image, vendor, and stock location.
If you delete the original products before confirming that your variants are correctly connected to Everspring, you risk removing the only properly linked products in your catalog.
This can cause Everspring to automatically recreate missing products as new single listings — resulting in duplicate or incorrect products.
Always test in your production store first.
Skipping these steps can cause irreversible data loss and disrupt fulfillment.
Common Issue: Deleted or Unlinked Products
This is a common mistake that often leads to broken product connections and duplication:
What Happened
-
The user deleted products that were already linked to Everspring.
-
They created new variants, but didn’t link them properly — missing one or more of the three required fields:
-
Vendor = Everspring
-
Stock location = Everspring
-
Correct SKU
-
-
Because the new variants weren’t connected, Everspring detected missing linked items and automatically recreated them as new single products.
Why This Is a Problem
The original products were correctly linked and ready to sync.
After creating variants, the user assumed they were connected automatically — but since one or more fields were missing, the link was broken.
By deleting the old products too early, there were no connected products left, so Everspring recreated them.
Summary
| Step | Action | Purpose |
|---|---|---|
| 1 | Create variants (color/size) | Combine similar products into one |
| 2 | Add variant images | Show accurate visuals |
| 3 | Set Vendor = Everspring | Identify the correct supplier |
| 4 | Set Stock location = Everspring | Ensure fulfillment through Everspring |
| 5 | Link the correct SKU | Connect to Everspring’s system |
| 6 | Verify & remove duplicates | Keep your store organized and synced |
Frequently Asked Questions
1. Where can I find my SKUs?
You can find them in your Everspring catalog or in the product feed that syncs to Shopify.
2. What if the Vendor or Stock Location is not set to Everspring?
Everspring won’t recognize the product. You must set both fields to Everspring for proper synchronization.
3. What if a variant doesn’t have a SKU?
It won’t be connected to Everspring, and orders for that variant won’t be processed.
4. Can I use multiple variant types (e.g. color and size)?
Yes. Shopify supports multiple variant options per product.